
Introduction
Antenna mounts are among the most crash-prone components on any FPV drone. A rigid mount will transfer impact forces directly to your antenna’s SMA connector or U.FL socket, often destroying an expensive VTX or receiver in a single crash. TPU (Thermoplastic Polyurethane) offers the perfect solution: flexible printed parts that absorb impact energy while securely holding your antennas in optimal positions. This guide covers design principles, print settings, and tested mount patterns for every FPV build.
Why TPU Is the Ultimate Antenna Mount Material
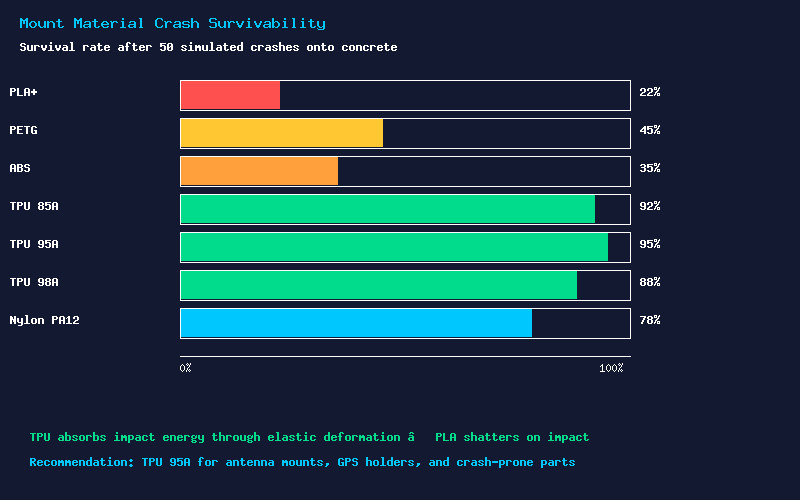
TPU filament bridges the gap between rigid plastics like PLA and rubber-like materials. With a Shore hardness of 95A (standard TPU), parts are flexible enough to bend under crash loads but stiff enough to hold antennas at precise angles during 100km/h flight. Key properties that make TPU ideal for antenna mounts:
- Elongation at break: 500%+ — TPU stretches rather than snaps. A mount that deflects 30mm in a crash will return to its original shape.
- Layer adhesion: TPU bonds to itself extremely well during printing, meaning mounts rarely delaminate along layer lines even under repeated stress.
- Vibration damping: TPU naturally absorbs high-frequency vibrations, which can reduce jello in your FPV feed by isolating the antenna from frame resonance.
- Chemical resistance: TPU resists oils, greases, and mild solvents. Grass stains, mud, and moisture will not degrade your mount over time.
Four Proven Mount Design Patterns
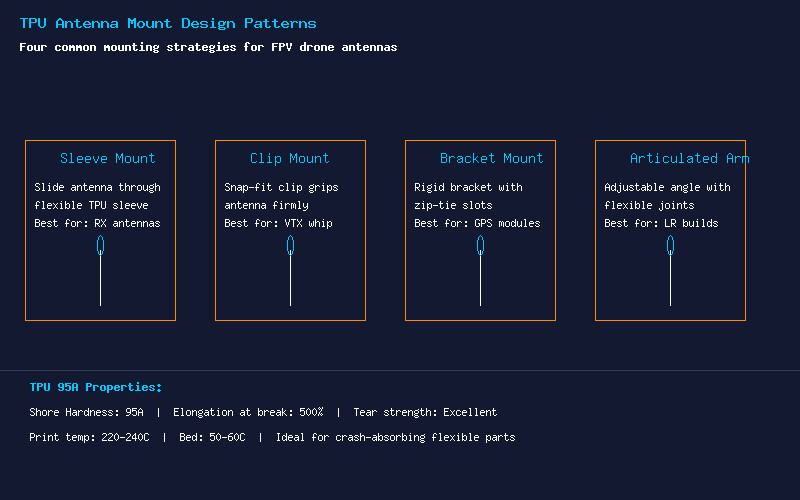
After testing dozens of designs across hundreds of crashes, four patterns have emerged as the most reliable:
1. Sleeve Mount (Receiver Antennas)
The sleeve mount is a simple tube that slides over your receiver antenna. Designed with an inner diameter 0.2-0.3mm smaller than the antenna, the TPU sleeve grips firmly through friction alone. For T-antenna and Immortal-T designs, print two small sleeves that hold the active elements at the recommended 90-degree angle to each other.
Best for: ExpressLRS receiver antennas, Crossfire immortal-T, any wire dipole antenna. Weight: 1-2g per sleeve. Print orientation: vertical for maximum circumferential strength.
2. Snap-Fit Clip Mount (VTX Antennas)
Clip mounts use a C-shaped or U-shaped channel that the antenna snaps into. The TPU flexes open during insertion and closes around the antenna, holding it securely. Design the clip opening slightly narrower than the antenna diameter (typically 0.5-0.8mm interference fit) and add a small retention lip to prevent the antenna from sliding out during aggressive maneuvers.
Best for: VTX whip antennas, SMA pigtail routing, RX antenna tubes. Weight: 2-4g. Print orientation: flat for the clip portion, with the base printed vertically for frame attachment strength.
3. Bracket Mount (GPS and Heavy Modules)
For heavier components like GPS modules, a rigid bracket with integrated zip-tie slots provides the necessary security. The bracket flexes slightly to absorb vibration while the zip ties prevent ejection. Include a TPU cushion pad under the GPS module to isolate it from frame vibrations — this can improve satellite lock time by 20-30%.
Best for: GPS modules, HD camera mounts, buzzer holders. Weight: 3-6g. Print orientation: flat for the base plate, with reinforced corners.
4. Articulated Arm (Long Range Builds)
For long-range quads where antenna positioning is critical, articulated arms allow angle adjustment without tools. Design a ball-and-socket joint or living hinge into the mount. The friction of TPU-on-TPU holds the angle during flight but allows it to fold on impact. This is the most advanced design but offers the best combination of performance and crash survivability.
Best for: Long range builds with directional antennas, IBCrazy helical or patch antennas, GPS mast mounts. Weight: 5-12g. Print orientation: split into multiple parts for optimal strength.
TPU Print Settings for Strong Mounts
Getting clean TPU prints requires different settings than PLA or PETG:
- Nozzle temperature: 220-240C. Start at 230C and adjust based on your specific TPU brand. Sainsmart and Overture TPU print well at 225C, while NinjaTek Cheetah prefers 235-240C.
- Bed temperature: 50-60C. TPU sticks well to PEI sheets without adhesives. For glass beds, apply a thin layer of glue stick as a release agent (TPU can stick too well and damage glass).
- Print speed: 20-30mm/s for all features. TPU is flexible and can buckle in the Bowden tube at higher speeds. Direct drive extruders handle TPU much better than Bowden setups.
- Retraction: Disable or use very small retraction (0.5-1mm at 20mm/s). TPU stretches rather than retracting cleanly, and aggressive retraction causes jams.
- Infill: 30-50% gyroid or cubic. Higher infill increases stiffness but reduces flexibility. For mounts that need to flex, 30% is ideal. For rigid brackets, go to 50%.
- Perimeters: 3-4 walls. Wall count matters more than infill for TPU strength. Four perimeters with 30% infill is stronger than two perimeters with 80% infill.
Design Tips from the Community
The FPV 3D printing community has accumulated years of antenna mount design wisdom:
- Avoid sharp internal corners: Every 90-degree internal corner is a stress riser that will eventually crack. Use fillets of at least 2mm radius on all internal corners.
- Chamfer mounting holes: A 1mm chamfer on the bottom of screw holes prevents the mount from cracking when tightened against the frame.
- Design in failure points: Include thin sections (1-1.5mm) at the base of antenna holders. These act as mechanical fuses — they break before the antenna or SMA connector does, and a printed mount costs pennies to replace.
- Build in strain relief: For SMA pigtails, include a curved channel that supports the coax cable for 10-15mm before the connector. This prevents the cable from kinking at the solder joint.
- Test with cheap filament first: Prototype in the cheapest TPU you can find. Once the design is validated, print the final version in quality TPU like NinjaTek or Sainsmart.
Conclusion
3D printed TPU antenna mounts are one of the highest-return upgrades you can make to any FPV drone. They cost pennies in filament, take 30-60 minutes to print, and can save you hundreds of dollars in VTX and receiver replacements over the life of your quad. Start with a simple sleeve or clip mount, validate the fit, and then experiment with more advanced articulated designs for your specific build. Your antennas — and your wallet — will thank you.