
Introduction
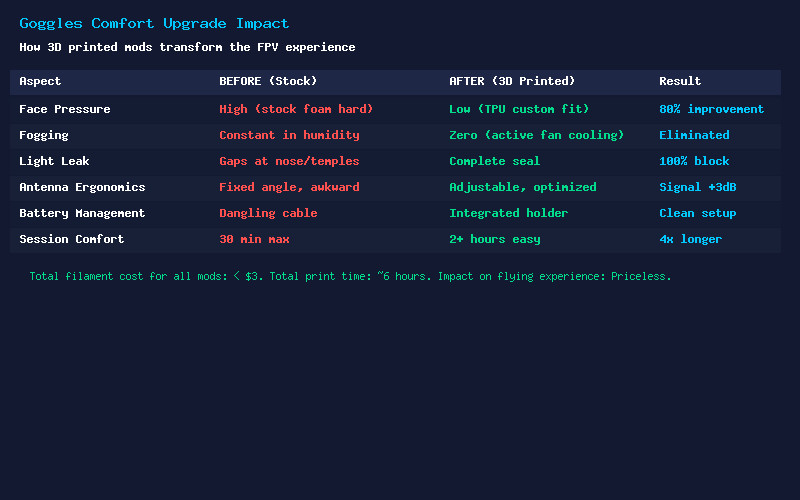
FPV goggles are the most personal piece of equipment in the hobby — and also the most uncomfortable out of the box. Stock face plates rarely fit perfectly, lenses fog at the worst moments, and dangling battery cables snag on everything. The solution is not buying more expensive goggles — it is 3D printing accessories that transform your existing goggles into a perfectly customized, comfortable, and functional ground station. This guide covers the most impactful 3D printed goggle mods, from cooling fans to custom face plates, with print settings and design tips for each.
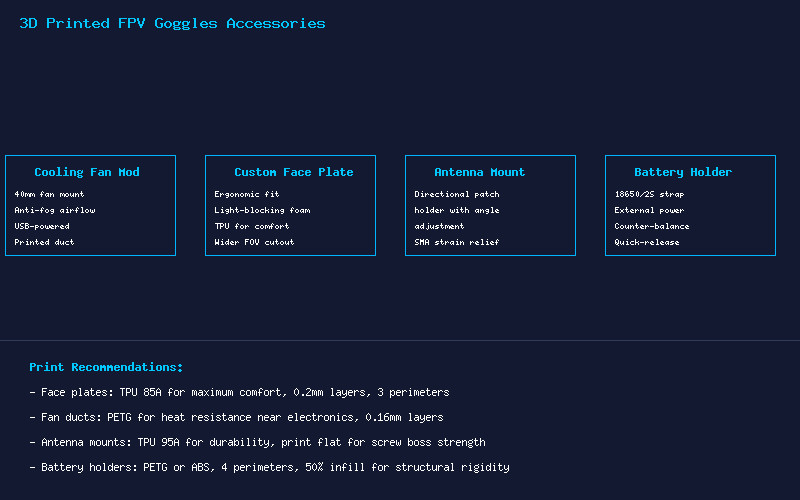
Cooling Fan Mod: Never Fog Again
Lens fogging is the most common goggle frustration, especially in humid climates or during summer sessions. A 3D printed fan duct with a 40mm server fan solves this permanently. The design clips onto the goggle face plate and directs a gentle airflow across the lenses, preventing condensation before it forms.
Design essentials: The fan duct should mount at the top or side of the goggles, directing air downward across the lens surface. Use a 40x40x10mm 5V fan (Noctua NF-A4x10 is the gold standard for silence and reliability). Power it from a USB port on the goggles or a small external power bank. Print the duct in PETG for heat resistance (the electronics generate minimal heat, but the enclosure can warm up in direct sun).
Print settings: PETG, 0.16mm layer height, 3 perimeters. Orient the duct vertically with the fan mount on the bed. No supports needed if duct transitions are kept to 45 degrees or less. Total print time: approximately 45 minutes. Add a small foam gasket between the fan and duct to eliminate vibration noise.
Custom Face Plate: Comfort That Actually Fits
Stock goggle face plates are designed for an “average” face that fits no one perfectly. A custom 3D printed face plate, modeled to match your facial geometry, transforms comfort. TPU 85A filament provides a soft, flexible interface that conforms to your face, blocks 100% of outside light, and distributes pressure evenly.
Design approach: Start by tracing your stock face plate outline onto paper as a template. Measure key points — nose bridge width, cheekbone spacing, temple distance. Model the face plate in Fusion 360 with a 3-4mm thick TPU body and a 2mm flexible lip around the edge for light sealing. The key dimension is the nose cutout: too tight and it pinches, too loose and light leaks in. Iterate with cheap TPU until the fit is perfect, then print the final version in quality TPU.
For Fat Shark and Skyzone goggles, Thingiverse and Printables have dozens of community-designed face plates that you can remix. Start with an existing design close to your goggle model, then modify the nose and cheek contours in your slicer using negative volume modifiers.
Antenna Mounts: Optimize Your Signal
Goggle-mounted antennas rarely sit at optimal angles with stock mounts. A 3D printed articulated antenna mount lets you position a directional patch antenna at exactly the right angle for your flying style, then fold it flat for transport.
Key design features: A friction hinge (TPU-on-TPU or TPU-on-PLA) that holds position during use but allows adjustment. An angle scale printed into the mount (0, 15, 30, 45 degrees) for quick reference. SMA connector strain relief that supports the antenna’s weight without stressing the goggle’s SMA port. For dual-antenna setups, a bridge mount that positions the omni antenna vertically and the patch angled 15-30 degrees upward — the optimal configuration for most flying.
Print the mount body in TPU 95A for durability and the hinge mechanism in PLA+ for consistent friction. A small M3 bolt through the hinge with a nylon locknut provides adjustable tension.
Battery Holder: Clean Up the Dangling Cable
The stock solution of a battery in your pocket with a long cable is functional but annoying. A 3D printed battery holder that mounts to the goggle strap solves this elegantly. The holder positions a 2S 18650 pack or LiPo at the back of the head strap, acting as a counterweight that balances the goggles and reduces neck fatigue.
Design considerations: The holder should be positioned at the rear strap, adjustable for head size. Include cable management channels that route the power cable cleanly along the strap. The battery compartment should securely grip the pack — TPU is ideal here for its grip and flexibility. A quick-release mechanism (TPU snap latch) allows battery swaps without removing the goggles.
For 18650-based packs, design the holder for two cells in series (2S) with integrated contacts salvaged from a cheap battery holder. For LiPo packs, a simple TPU sleeve with velcro strap slots is sufficient. Print in PETG or ABS for rigidity, with TPU inserts for the grip surfaces.
Other Must-Have Printed Accessories
- Lens protector: A snap-on TPU cover that protects goggle lenses when not in use. Prevents scratches and dust accumulation. Prints in 20 minutes.
- SD card case: A tiny holder that clips to the goggle strap, holding 2-4 microSD cards. No more searching pockets for a card between flights.
- Head strap clips: Replace the stock plastic clips that always break. Print in Nylon PA-CF for unbreakable replacements.
- Diopter insert holders: If you wear glasses, a custom insert holder positions prescription lenses at the correct distance from the goggle optics. Model to your specific lens shape and goggle model.
Printing Tips for Goggle Accessories
- Material selection: TPU 85A for face-contact parts (face plate, light seals), TPU 95A for flexible structural parts (clips, mounts), PETG for rigid parts (fan ducts, brackets), Nylon for high-stress parts (strap clips).
- Surface finish: Sand face-contact surfaces with 400-grit sandpaper for a smooth feel. TPU sands poorly, so focus on getting clean prints rather than post-processing.
- Fit testing: Print fit-test parts at 2 perimeters and 10% infill first. A failed print at 15 minutes and $0.05 of filament is much better than a failed 2-hour print.
- Hygiene: TPU face plates can be washed with mild soap and water. Print a spare face plate for when one is drying after cleaning.
Conclusion
For under $3 in filament and a weekend of printing, you can transform uncomfortable stock goggles into a personalized, fog-free, perfectly balanced ground station. Start with the cooling fan and custom face plate — these two mods alone will improve your flying experience more than any $200 goggle upgrade. Then add antenna optimization and battery management as your needs grow. The beauty of 3D printing is that every accessory is customized exactly to your face, your goggles, and your flying style.