
From Idea to Installed Part in One Evening
One of the most satisfying experiences in the FPV hobby is designing a custom mount for your specific build, printing it in TPU, and having it fit perfectly on the first try. With modern CAD tools, even beginners can go from concept to functional part in a single evening. This guide walks through the complete workflow for designing and printing custom TPU mounts for your FPV drone.
Measurement: The Foundation of Good Design
Every successful 3D-printed mount begins with accurate measurements. A digital caliper is non-negotiable — the $20 iGaging or Neiko models on Amazon are more than adequate. Measure mounting hole spacing on your frame, the dimensions of the component you are mounting, and clearance requirements around surrounding parts. Always measure at least twice. Document your measurements in millimeters, which is the native unit in most CAD software.
For complex shapes like camera housings or VTX cases, take reference photos from multiple angles. Import these into your CAD environment as canvases and scale them to match your caliper measurements. This technique, called photogrammetry-assisted modeling, produces surprisingly accurate results without expensive 3D scanning equipment.
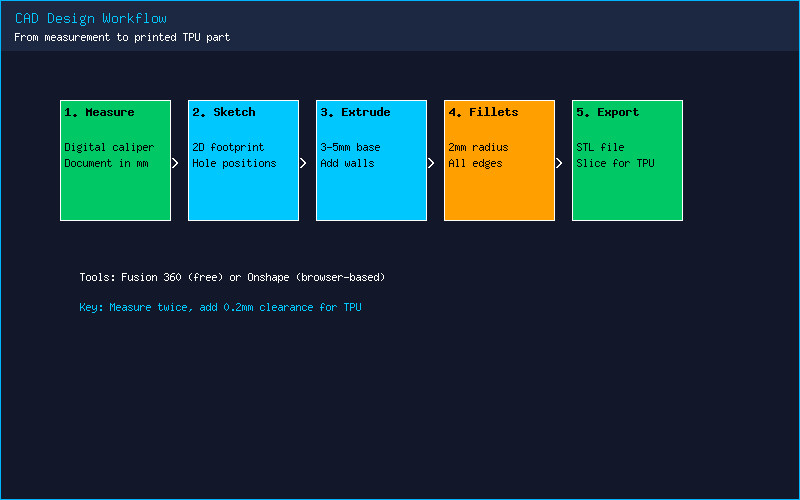
CAD Design in Fusion 360 or Onshape
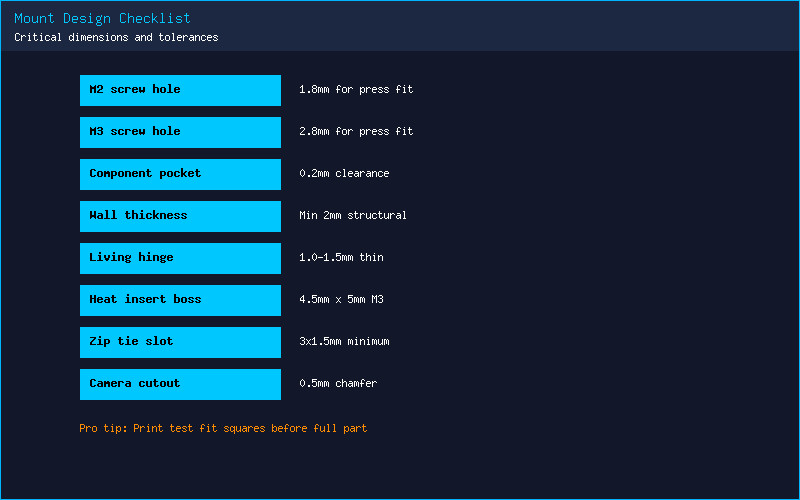
Fusion 360 (free for personal use) and Onshape (free for public documents) are the two most popular CAD tools in the FPV community. Start with a simple sketch on the XY plane, drawing the mounting footprint with hole locations. Extrude this into a base plate 3-5 mm thick — thick enough for structural integrity, thin enough to save weight. Add walls around the component you are mounting, leaving 0.2 mm clearance on each side for TPU’s slight expansion during printing.
The key design principle for TPU parts is to avoid sharp internal corners, which concentrate stress and tear during crashes. Add fillets (rounded corners) of at least 2 mm radius to every internal edge. For parts that flex repeatedly — like antenna holders or GoPro mounts — incorporate living hinges: thin sections (1-1.5 mm) of TPU that bend rather than break. Design mounting holes 0.2 mm smaller than your screw diameter for a tight press-fit.
TPU Print Settings for Reliable Results
TPU demands respect from your printer. Start with these proven settings: nozzle temperature 230C, bed temperature 50C on PEI with glue stick release agent, print speed 25 mm/s with all speeds (walls, infill, travel) set uniformly to maintain consistent extrusion pressure. Disable retraction entirely or limit it to 0.5 mm at 20 mm/s. Enable combing mode “Within Infill” to keep the nozzle inside printed areas and minimize stringing.
Infill matters more for TPU than PLA. Gyroid infill at 30-40% provides isotropic strength — unlike grid or cubic patterns, gyroid distributes force evenly in all directions, critical for crash-resistant parts. Use 3-4 perimeters (wall loops) for structural integrity. A 0.4 mm nozzle at 0.2 mm layer height is the sweet spot for detail versus print time. For fine features like camera lens cutouts, a 0.25 mm nozzle at 0.12 mm layer height produces cleaner results at the cost of doubled print time.
Iteration and Field Testing
Your first print will rarely be perfect. Print in a cheap TPU (like Overture or eSun at $20/kg) for prototypes, then switch to premium TPU (SainSmart, NinjaTek, or Polymaker) for the final version. Test fit on the bench, then fly three packs with aggressive maneuvers. Inspect for stress marks (white discoloration in TPU), looseness, or cracking. Adjust your design, reprint, and test again. The beauty of 3D printing is that iteration costs pennies and hours, not dollars and weeks.
When your design is finalized, share it on Printables or Thingiverse. The FPV 3D printing community is incredibly collaborative, and the mount you designed for your obscure frame might be exactly what someone else has been searching for. Tag it with FPV, drone, TPU, and your frame model for discoverability.
What CAD software do you use for FPV designs? Share your favorite custom mount below — we would love to see it!