
Introduction
Building your first 5-inch FPV drone is a rite of passage. It’s the moment you stop being a consumer of pre-built drones and become a builder who truly understands how every component works together. A self-built 5-inch quad flies better than any bind-and-fly model because you can select each component for your specific flying style. This comprehensive guide walks you through the entire process.
Why Build Instead of Buy?
- Component quality: BNF drones often cut corners on ESCs, VTX, or camera. When you build, you choose every component.
- Repairability: When (not if) you crash, you’ll know exactly how to fix everything because you built it.
- Customization: Want ELRS instead of Crossfire? A specific camera? Individual ESCs instead of a 4-in-1? You decide.
- Learning: Understanding the electrical system, Betaflight configuration, and mechanical assembly makes you a better pilot.
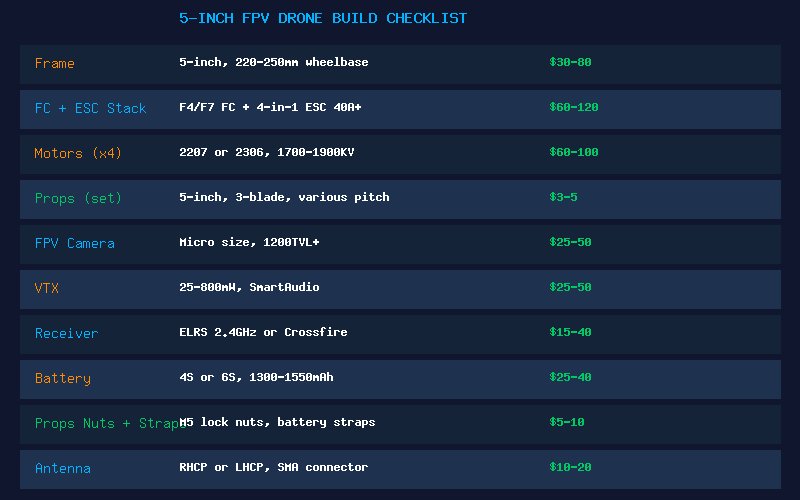
Part 1: Component Selection
Frame: ~$40-80
For your first build, choose a well-documented, popular frame with replaceable arms. The TBS Source One V5 ($30) is the gold standard for beginners — open source, massive community, cheap replacement parts. The ImpulseRC Apex ($90) or Armattan Badger ($95) are premium alternatives with lifetime warranties.
Flight Controller + ESC Stack: ~$80-120
An F7 FC with a 4-in-1 ESC is the modern standard. Look for these features:
- F7 processor (faster than F4, more UARTs for future expansion)
- 40A+ ESC rating (provides headroom for 6S and aggressive flying)
- Built-in Betaflight OSD (on-screen display shows voltage, RSSI, timer in goggles)
- Plug-and-play connectors (reduces soldering errors)
Recommended: SpeedyBee F7 V3 stack ($80), T-Motor F7 + F55A Pro II ($110)
Motors: ~$60-90 for set of 4
For a 6S 5-inch freestyle build, choose 2207 or 2306 motors in the 1700-1950KV range. Popular choices:
- XING2 2207 1855KV — Excellent mid-range option, smooth and powerful
- T-Motor Velox V3 2207 1750KV — Premium, buttery smooth bearings
- iFlight XING-E Pro 2207 1800KV — Budget-friendly, solid performance
Props: ~$3-5 per set
Start with HQProp 5×4.3×3 V2S or Gemfan 51466. These are durable, well-balanced props that work well with the motor KV range above. Buy multiple sets — you’ll break props.
FPV Camera: ~$25-50
A micro-sized camera (19mm wide) with at least 1200TVL resolution fits most modern frames. The Caddx Ratel 2 ($30) and RunCam Phoenix 2 ($45) are excellent choices with good low-light performance.
VTX (Video Transmitter): ~$25-50
Get a VTX with SmartAudio or Tramp protocol (allows changing channel/power from Betaflight OSD). Minimum 400mW, preferably up to 800mW. The Rush Tank Ultimate ($40) and TBS Unify Pro32 ($50) are proven performers.
Receiver: ~$15-40
ELRS (ExpressLRS) at 2.4GHz is the modern standard. Inexpensive, incredible range, low latency. The Happymodel EP1 ($15) or Radiomaster RP1 ($15) are all you need.
Battery: ~$25-40 each
Start with two 6S 1300-1400mAh packs from CNHL or Tattu. Two packs will give you about 8-12 minutes total flying time before recharging.
Accessories: ~$15-30
XT60 connector with pigtail, battery straps (2), prop nuts (M5 lock nuts), antenna (RHCP), zip ties, heat shrink, and electrical tape.
Part 2: Assembly Order
- Frame assembly: Assemble the frame arms to the bottom plate. Don’t fully tighten screws yet — you’ll need to adjust for component fitment.
- Mount motors: Attach motors to arms using the provided screws (usually M3 x 6-8mm). Check that screws don’t protrude into the motor windings — this will destroy the motor. Use threadlocker on motor screws.
- Mount FC/ESC stack: Install the stack using the provided gummies/standoffs. Ensure the stack is centered and level. The ESC should be below the FC with an air gap between them.
- Route motor wires: Route motor wires along the arms to the ESC pads. Use zip ties or electrical tape to secure wires against the arms. Leave enough slack near the ESC for soldering.
- Solder motor wires: Solder all 12 motor wires to the ESC pads. Double-check the motor order and direction — you can reverse motor direction in Betaflight later, but getting it right now saves time.
- Mount camera and VTX: Install camera in the frame’s camera cage. Mount VTX in a location that gets airflow (usually behind the camera or on the top plate).
- Mount receiver: Place the receiver antenna(s) as far from the VTX antenna as possible. For ELRS with a T-antenna, mount the active elements in a V-shape at the rear arms.
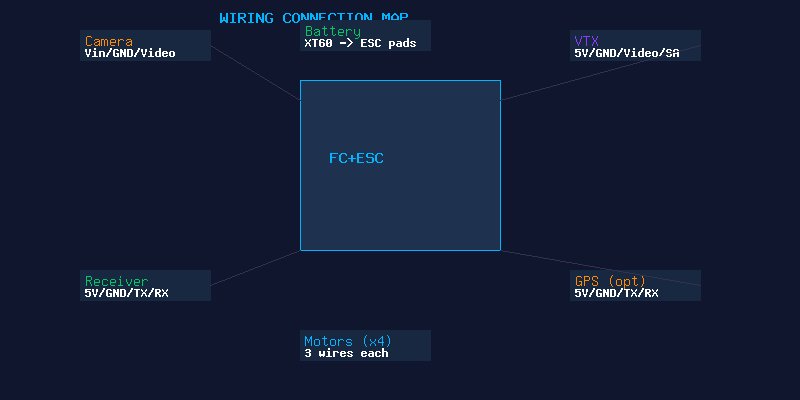
- Wire everything: Connect camera to FC (Vin, GND, Video signal). Connect VTX to FC (5V/Vbat, GND, Video, SmartAudio). Connect receiver to FC (5V, GND, TX, RX). Solder battery pigtail to ESC pads.
- Install top plate: Once all wiring is complete and tested, install the top plate and tighten all frame screws.
Part 3: Betaflight Configuration
- Flash latest Betaflight: Download Betaflight Configurator, put FC in DFU mode, and flash the latest stable release for your FC target.
- Apply default settings: Load the UAV Tech preset for your build type from the Presets tab.
- Configure ports: Set the correct UART for your receiver (Serial RX) and VTX SmartAudio.
- Configure receiver: Set protocol to CRSF (for ELRS/Crossfire). Check that all channels respond correctly in the Receiver tab.
- Configure modes: Set up ARM, ANGLE (for emergencies), BEEPER, and FLIP OVER AFTER CRASH switches.
- Motor setup: In the Motors tab, test each motor individually. Confirm correct motor numbering and direction. Reverse any incorrect motors in the Motors tab or using the Motor Direction wizard.
- VTX setup: Configure VTX table for your specific model. Set initial power and channel.
- Check failsafe: Turn off your radio while connected to Betaflight — the quad should show “RX Loss” and disarm. Double-check the failsafe stage 2 settings.
Pre-Flight Checklist
- All frame screws tight (with threadlocker where appropriate)
- Props installed with correct orientation (text facing up)
- Prop nuts fully tightened
- Battery strap securely holding battery
- All antennas properly secured and not touching props
- VTX antenna connected (never power on without antenna!)
- Receiver antennas clear of carbon fiber and props
- Arm switch works and failsafe is configured
- OSD displays voltage, RSSI, and flight timer
- First flight: hover at low altitude for 30 seconds, land, check motor temperatures
Conclusion
Building your first 5-inch drone is a deeply satisfying experience. The first time you arm the quad, lift off, and realize that machine you assembled from individual components actually flies — there’s nothing quite like it. Take your time, double-check every solder joint, and don’t rush the Betaflight setup. A careful build process results in a quad that flies reliably for hundreds of packs. Happy building!