
Introduction
Building a micro FPV whoop from scratch is one of the most satisfying projects in the hobby. These tiny 75mm quads weigh under 40 grams, fly indoors with remarkable agility, and can be built for around 30 in parts. This complete build log covers everything from printing the frame to your first flight, with a detailed parts list and step-by-step assembly instructions.
Why Build Instead of Buy?
Pre-built whoops like the BetaFPV Meteor75 and Happymodel Mobula7 are excellent products. But building your own offers advantages that matter: you learn every component intimately, making repairs and troubleshooting second nature. You can choose each component for your specific priorities, whether that is lightweight acrobatics or extended flight time. And the 3D printed frame means you can reprint a broken part in 30 minutes for pennies instead of waiting for replacement frame shipments.
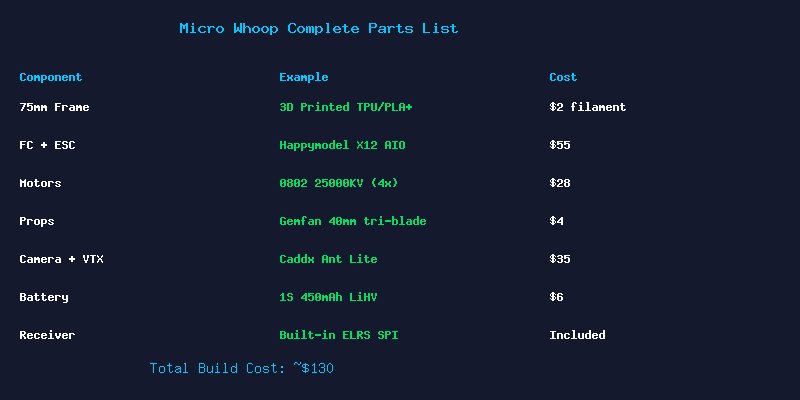
Complete Parts List
Frame
The frame is the only 3D printed component in this build. Use PLA+ for rigidity or TPU for crash durability. The design should follow standard 75mm whoop geometry with 25.5×25.5mm mounting, integrated prop guards, and a battery tray that supports 450-550mAh 1S packs. STL files for open-source whoop frames are available on Thingiverse search for “Micro FPV Whoop 75mm frame.”
Flight Controller and ESC
The Happymodel X12 AIO 5-in-1 board combines FC, 4x5A ESC, ExpressLRS SPI receiver, and onboard VTX on a single 25.5×25.5mm board. This eliminates all external wiring except motor solder pads, saving precious grams. The STM32F411 processor runs Betaflight 4.5+ with RPM filtering support. At 5, it is the go-to board for micro whoop builds in 2026.
Motors
Four Happymodel EX0802 25000KV motors provide the perfect balance of power and efficiency for 75mm whoops on 1S. These tiny 3.2g motors spin 40mm props with authority. The 1mm shaft is compatible with press-fit whoop props. Alternative options include the Rcinpower 1002 22000KV for slightly more torque at the cost of 1g per motor.
Props and Camera
Gemfan 40mm 3-blade props in 1mm shaft fit perfectly on the 0802 motors. Keep a stock of 20+ props they are consumable items in whoop flying. For video, the Caddx Ant Lite weighs just 2.5g and provides surprisingly good 4:3 image quality for its size. The Runcam Nano 4 is a premium upgrade with better low-light performance.
Batteries
1S LiHV (4.35V) batteries in 450-550mAh capacity deliver 2.5-4 minutes of aggressive flying. The BetaFPV 450mAh BT2.0 packs are the current community favorite. Upgrade your power lead to BT2.0 connectors they provide significantly lower resistance than the old PH2.0 standard.
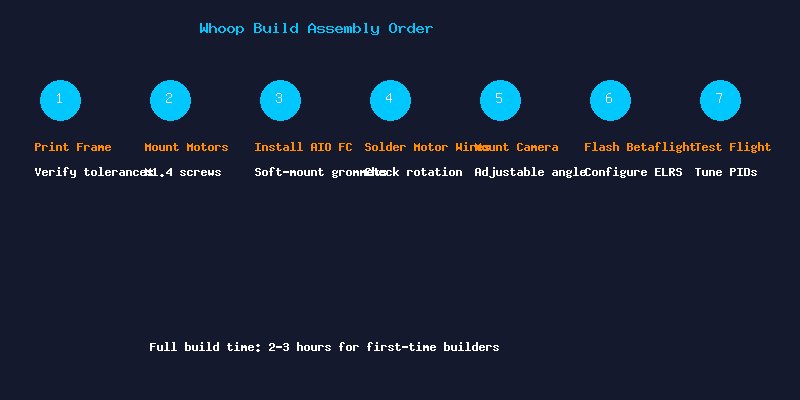
Step-by-Step Build Guide
Step 1: Prepare the 3D Printed Frame
Print the frame with 3 walls and 30% infill. Clean any stringing with a deburring tool. Test-fit the AIO board to ensure the mounting holes align before proceeding.
Step 2: Mount Motors
Install motors using M1.4x4mm screws with a tiny drop of blue Loctite. Thread motor wires through the frame ducts for a clean build. Note the motor rotation pattern: front-left and rear-right spin clockwise; front-right and rear-left spin counter-clockwise.
Step 3: Install AIO Flight Controller
Mount the FC using the included rubber grommets for soft mounting. This reduces vibration transferred to the gyro, resulting in cleaner flight performance. Orient the board with the USB port facing right for easy access.
Step 4: Solder Motor Wires
Solder motor wires to the AIO pads. Trim wires to the shortest practical length to save weight. After soldering, use a multimeter to check for shorts between pads before connecting power.
Step 5: Mount Camera
The Caddx Ant Lite mounts in the TPU canopy at a fixed 25-30 degree angle. Hot glue provides vibration dampening while keeping the camera removable for maintenance.
Step 6: Configure Betaflight
Flash Betaflight 4.5 or newer. Enable bidirectional DShot300 and RPM filtering. Configure ExpressLRS SPI receiver on the correct UART. Set the motor protocol to DShot300 and update the PID profile to the UAVModel recommended whoop tune (available on our website).
Step 7: Maiden Flight
Arm in angle mode for the first flight. Hover at eye level and verify stable attitude. Land, switch to acro mode, and gradually increase rates as your confidence builds. Expect 2.5-4 minutes of flight time depending on flying style.
Upgrades and Modifications
Once comfortable with the base build, consider these upgrades: BT2.0 power connector for increased punch and flight time, 1002 motors for more top-end speed, a lightweight LED strip for orientation and style, or a 2S conversion using the BetaFPV 2S AIO board for outdoor-capable power.
Conclusion
Building a 3D printed micro whoop is an accessible project that teaches the fundamentals of FPV drone construction. At 30 all-in, it is one of the most affordable ways to enter the hobby. The satisfaction of flying a drone you designed and built yourself is unmatched. Print your frame, source the parts from our recommended vendors, and join the UAVModel community to share your build.