
Introduction
Your FPV camera is your eyes in the sky. No matter how perfectly tuned your quad is or how smooth your flying, if your camera image is washed out, too dark, or poorly configured, you’re flying blind. Getting your camera settings right transforms the FPV experience from “I can kind of see where I’m going” to a crisp, detailed video feed that makes you a better pilot.
Understanding Exposure
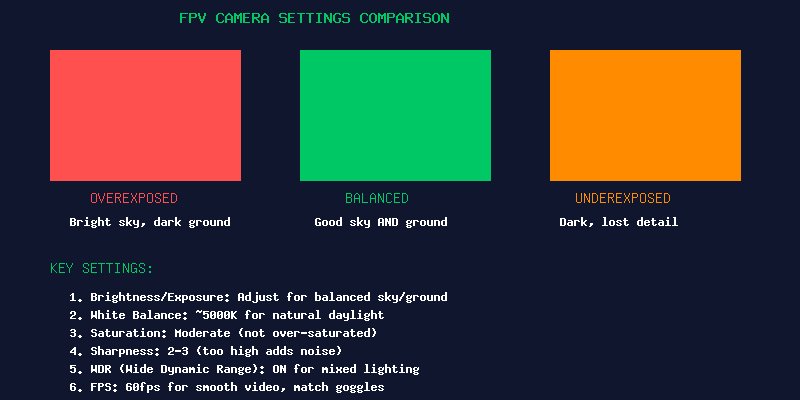
Exposure is the foundation of image quality. Too bright and the sky washes out completely — you can’t see branches or obstacles against a white sky. Too dark and you lose all detail in shadows, making it impossible to fly through trees or under structures.
The challenge in FPV is that lighting conditions change constantly. You fly from bright sun into shadow, from looking at the sky to looking at the ground. Your camera needs to handle both extremes gracefully.
Key settings:
- Brightness/Exposure Value: Start at the default (usually 0) and adjust based on conditions. Reduce brightness on bright sunny days so the sky retains some detail. Increase slightly on overcast days.
- WDR (Wide Dynamic Range): Turn this ON. WDR is the single most important setting for handling mixed lighting. It processes the image to bring out detail in both bright and dark areas simultaneously. Without WDR, you’re constantly choosing between seeing the sky or seeing the ground.
- BLC (Backlight Compensation): Helps when flying toward the sun. Some cameras handle this automatically; others let you adjust the strength. Start with default settings.
White Balance
White balance controls the color temperature of your image. Get it wrong and everything looks unnaturally blue (too cold) or orange (too warm).
Recommended settings:
- Daylight flying: 5000-5500K — most natural for mid-day sun
- Late afternoon/golden hour: 4500-5000K — compensates for the warmer light
- Overcast/cloudy: 5500-6000K — adds warmth to cool, flat light
- Auto WB: Avoid. Cameras that constantly shift color temperature are disorienting. Manual WB provides a consistent look.
Saturation and Sharpness
These two settings dramatically affect how “good” your FPV feed looks:
Saturation (Color intensity): Keep this moderate. Over-saturated video looks unnatural — grass becomes neon green and sky turns electric blue. Under-saturated video looks washed out and makes it hard to distinguish objects. A setting of 50-65% on most cameras is the sweet spot.
Sharpness (Edge enhancement): This is subjective but important. Too high (8-10 on a 1-10 scale) adds artificial halos around edges and amplifies video noise, making the image look “crunchy.” Too low (1-2) makes the image soft and makes it harder to see small branches and wires. A setting of 3-5 provides clear edges without artifacts.
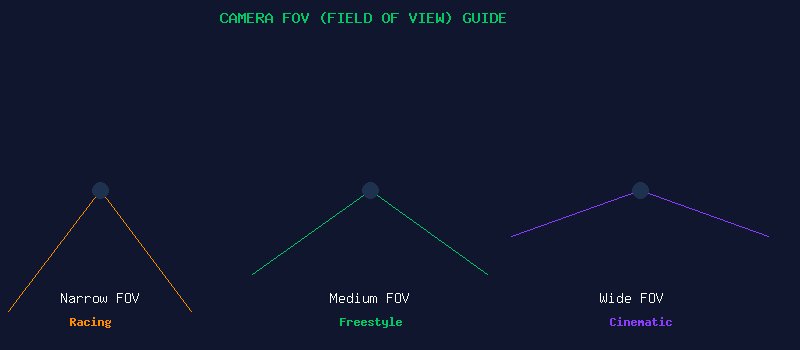
Field of View (FOV) and Lens Selection
The camera lens determines your FOV — how much of the world you see through your goggles. This is a deeply personal preference, and finding your ideal FOV takes experimentation.
- 1.8mm lens (~165° FOV): Ultra-wide. You see everything, but the image has significant “fisheye” distortion. Objects appear smaller and further away than they are. Good for cinematic flying where spatial awareness is key. Poor for precision proximity flying — depth perception suffers.
- 2.1mm lens (~150° FOV): The most common FPV lens. Wide enough for good awareness but with less distortion than 1.8mm. Excellent all-around choice.
- 2.5mm lens (~130° FOV): Moderate FOV. Objects appear more natural in size. Better depth perception for racing and tight proximity. Less peripheral vision means you need to turn your head more to see around you.
- 2.8mm lens (~110° FOV): Narrow. Very natural-looking image, excellent depth perception. Good for long range where you want to see details far away. Challenging for close-quarters flying.
Recommendation for beginners: Start with a 2.1mm lens. It’s the most forgiving and widely used. You can always swap lenses later — they’re inexpensive.
Frame Rate and Latency
Modern FPV cameras can output at various frame rates. Higher frame rates = smoother motion = slightly more latency.
- 30fps: Lowest latency, slightly choppy motion. Some pilots prefer this for racing where every millisecond counts.
- 60fps: The sweet spot. Smooth motion with negligible added latency. Most pilots fly at 60fps.
- 120fps: Ultra-smooth, but only works with goggles that support high frame rates. Adds measurable latency.
Match your camera’s output frame rate to what your goggles and VTX support. Most FPV goggles refresh at 60Hz, so 60fps is ideal.
Camera Settings by Flying Style
Racing: Prioritize low latency. Use 4:3 aspect ratio, minimal post-processing (no WDR in some cases), slightly higher sharpness to see gates clearly. Run in black and white if your camera supports it — the lack of color processing reduces latency by a few milliseconds.
Freestyle: Balanced settings. WDR on, moderate saturation, 16:9 aspect ratio if your camera supports it. 60fps for smooth motion during flips and rolls.
Cinematic/Long Range: Highest image quality. WDR on, carefully tuned white balance for natural colors, 16:9. You’re not worried about a few milliseconds of latency — you want the best possible picture to frame your shots.
Recommended Cameras
- Budget: Caddx Ratel 2 ($30) — Excellent value, great WDR, micro size
- Mid-range: RunCam Phoenix 2 ($45) — Industry standard, proven reliability, excellent low-light
- Premium: DJI O4 Air Unit / Caddx Vista — Digital FPV systems with far superior image quality but higher cost and weight
- Low-light specialist: Foxeer Cat 3 ($50) — Starlight sensor, can see in near-dark conditions
Conclusion
Spending 15 minutes tuning your camera settings is one of the highest-impact things you can do for your FPV experience. The difference between a poorly configured camera and a dialed-in one is night and day — you’ll see obstacles sooner, fly more confidently, and enjoy the view a lot more. Start with WDR on, white balance at 5000K, saturation at 55%, sharpness at 4, and 60fps. Fly a pack, adjust one setting, fly again. Within a few sessions, you’ll find your perfect configuration.