
Introduction
3D printing is an incredibly rewarding hobby — right up until your print fails at hour 14 of a 16-hour job. Print failures are frustrating, but every failure has a specific cause and a specific fix. This guide covers the most common 3D printing problems, their root causes, and step-by-step solutions to get you back to successful prints.

Problem 1: Stringing and Oozing
What it looks like: Thin wisps of plastic stretching between parts of your print, like spider webs. Common with PETG and TPU.
Root cause: Filament continues to ooze from the nozzle during travel moves. Insufficient retraction, temperature too high, or moisture in filament.
Fixes:
- Increase retraction distance (start with 4-6mm for Bowden, 1-2mm for direct drive)
- Increase retraction speed (40-60mm/s is typical)
- Lower nozzle temperature by 5-10°C
- Enable “wipe” or “coast” settings in your slicer
- Dry your filament — wet filament strings far more than dry filament
Problem 2: Warping and Curling
What it looks like: The corners or edges of your print lift off the build plate, especially on large flat parts. The bottom of the print curves upward.
Root cause: Plastic shrinks as it cools. The upper layers contract and pull the bottom layers upward, breaking adhesion with the bed. Most common with ABS and large PLA prints in cool rooms.
Fixes:
- Clean your build plate thoroughly with isopropyl alcohol (90%+) or warm soapy water
- Use a brim (5-10mm) to increase bed contact area
- Increase bed temperature (60-70°C for PLA, 100-110°C for ABS)
- Eliminate drafts — use an enclosure, especially for ABS
- Apply an adhesion aid: glue stick, hairspray, or PEI sheet
- Print the first layer slower and slightly hotter for better adhesion
Problem 3: Layer Shifting
What it looks like: The print looks like it suddenly shifted sideways at one or more layers. The entire upper portion of the print is offset from the lower portion.
Root cause: The stepper motor skipped steps, usually because the print head hit an obstacle, the belt slipped, or the motor lacked sufficient torque.
Fixes:
- Tighten X and Y axis belts — they should twang like a guitar string when plucked
- Reduce print speed, especially for travel moves
- Check that cables aren’t snagging on the frame as the print head moves
- Reduce acceleration and jerk settings in the slicer
- Check stepper driver current — if it’s too low, the motor can’t overcome resistance
- Ensure the print surface doesn’t wobble on its bearings
Problem 4: Under-Extrusion
What it looks like: Gaps between extrusion lines, weak layer adhesion, “spongy” or incomplete top layers. The print feels weak and can be crushed by hand.
Root cause: The printer isn’t pushing out as much filament as it thinks it is. Could be a partial clog, insufficient temperature, or extruder issues.
Fixes:
- Perform a cold pull to clear partial nozzle clogs
- Replace the nozzle if it’s worn (brass nozzles wear out quickly with abrasive filaments)
- Increase nozzle temperature by 5-10°C
- Check extruder tension — the filament should have light tooth marks from the drive gear
- Check for cracked extruder arm (common on plastic extruder assemblies)
- Calibrate E-steps to ensure the extruder is feeding the correct amount
- Check for heat creep (heat traveling up from the heat block into the cold end)
Problem 5: Poor First Layer / Bed Adhesion
What it looks like: The first layer doesn’t stick, or it goes down inconsistently — some areas are transparently thin while others are thick and rough.
Root cause: Incorrect nozzle-to-bed distance (Z-offset) or an unlevel bed.
Fixes:
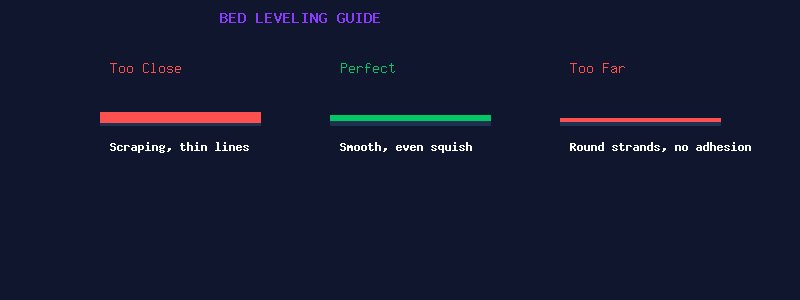
- Level your bed properly. Use the “paper method” — a standard sheet of paper should drag with slight resistance between the nozzle and bed at all four corners and center.
- If you have auto bed leveling: Still do a manual level first. Auto leveling compensates for minor variations, not a severely tilted bed.
- Adjust Z-offset during the first layer: Most printers let you “baby step” the Z height during printing. Watch the first layer go down and adjust until you see a smooth, flat line with good squish.
- The first layer line should be slightly flattened (not round) but not so flat that it’s transparent. Approximately 50% wider than the nozzle diameter is ideal.
Problem 6: Poor Overhangs and Bridging
What it looks like: The underside of angled surfaces looks rough, droopy, or has loops of filament hanging down. Bridges sag in the middle.
Root cause: The filament isn’t cooling fast enough to solidify before gravity pulls it down. Insufficient part cooling.
Fixes:
- Upgrade your part cooling fan and duct (one of the best upgrades you can make)
- Run part cooling fan at 100% for bridges and overhangs
- Reduce print speed for overhangs (your slicer likely has an “overhang speed” setting)
- Lower nozzle temperature slightly for better cooling
- Add supports for angles greater than 45-50 degrees
- Use “adaptive layer height” to print thinner layers on overhangs
Preventive Maintenance
Most print failures can be prevented with regular maintenance:
- Clean and lubricate Z-axis lead screws monthly
- Check and tighten belts every 50-100 print hours
- Replace the nozzle every 200-300 hours (more frequently with abrasive filaments)
- Clean the build plate before every print
- Keep firmware and slicer updated
- Store filament in sealed containers with desiccant
Conclusion
Every 3D printer owner goes through the frustration of failed prints. The key is to approach troubleshooting methodically: observe what went wrong, identify the likely cause, change ONE variable at a time, and test. Don’t change retraction, temperature, speed, and bed leveling all at once — you’ll never know which fix actually solved the problem. With practice, you’ll develop an intuition for what your printer needs, and failures will become rare rather than routine.