
Introduction
Soldering is a fundamental skill every FPV pilot must learn. Sooner or later, you’ll need to replace a motor, swap a VTX, or repair a broken wire at the field. Clean, reliable solder joints are the difference between a quad that flies perfectly for months and one that constantly has mysterious electrical problems. This guide will take you from complete beginner to confident solderer.
Essential Soldering Equipment
You don’t need to spend a fortune, but you do need the right tools. Here’s what to get:
- Temperature-controlled soldering iron: A $15 fixed-temperature iron from the hardware store will frustrate you endlessly. Invest in a proper temperature-controlled station. The Pinecil ($40) and TS100/TS101 ($60-80) are the gold standards for FPV. They’re portable, heat up in seconds, and can run off your LiPo battery at the field.
- Quality solder: 63/37 tin-lead rosin-core solder, 0.6-0.8mm diameter. This eutectic alloy melts and solidifies at exactly 183°C, making it the easiest to work with. Lead-free solder requires higher temperatures and is harder for beginners. Kester, MG Chemicals, and Chipquik are excellent brands.
- Flux: The secret weapon of clean soldering. Flux cleans oxidation from surfaces, helps solder flow, and prevents new oxidation during heating. A no-clean flux pen ($5-10) is perfect for FPV work.
- Tip cleaner: Use brass wool (not a wet sponge — thermal shock damages tips). The Hakko 599B brass tip cleaner is the standard.
- Helping hands: Something to hold your work. The classic alligator-clip helping hands work, but a small vise or PCB holder with silicone jaw covers is even better.
- Solder wick and/or desoldering pump: For fixing mistakes. Solder wick (copper braid) soaks up excess solder. A spring-loaded solder sucker removes large blobs.
- Heat shrink tubing: Get an assortment of sizes. Always slide the heat shrink onto the wire BEFORE soldering the joint.

Soldering Technique: Step by Step
Temperature Settings
Set your iron to 350°C (660°F) for most FPV work. For large pads (battery leads, ESC power pads), increase to 380-400°C. For delicate pads (small receiver wires), 320-340°C is sufficient.
Preparation
- Tin your iron tip: A clean, shiny tip transfers heat efficiently. Melt a small amount of solder onto the tip and wipe it on the brass wool. The tip should look silver and wet, not black and dry.
- Tin the wire: Strip 2-3mm of insulation, twist the strands tightly, apply a tiny amount of flux, then flow solder into the wire. You should see the solder wick all the way through the strands. The tinned wire should look like a solid silver extension, not a frayed mess.
- Tin the pad: Apply a small amount of solder to the pad on the flight controller or ESC. The pad should have a smooth dome of solder — not a mountain and not a flat disk.
- Join them: Hold the tinned wire on top of the tinned pad. Touch your iron to BOTH the wire and pad simultaneously. As soon as both melt together, remove the iron and hold the wire perfectly still for 2-3 seconds while the joint solidifies. Any movement during cooling creates a cold joint.
Identifying Good vs Bad Solder Joints
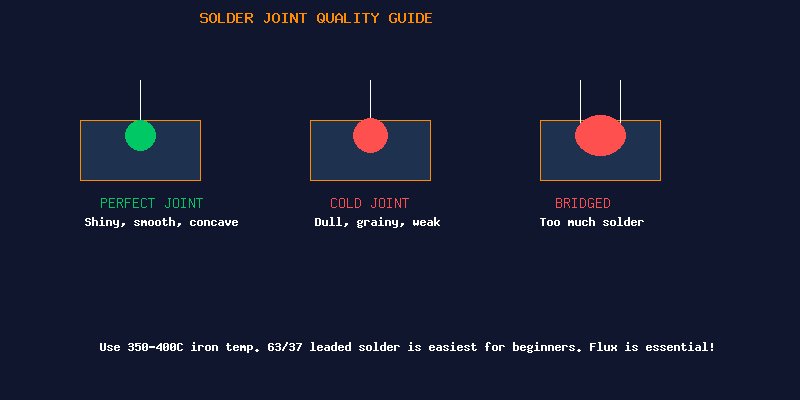
- Perfect joint: Shiny, smooth, concave fillet. The outline of the individual wire strands is barely visible. The solder completely covers the pad without overflowing onto adjacent pads.
- Cold joint: Dull, grainy, or lumpy appearance. Often caused by moving the wire while cooling, insufficient heat, or dirty surfaces. Cold joints have high electrical resistance and can fail intermittently. Reheat and add fresh solder.
- Bridged joint: Solder has flowed across two adjacent pads, shorting them together. Use solder wick to remove the excess and redo the joint.
- Insufficient solder: You can see bare pad or wire. Add more solder. A joint that looks “starved” is prone to breaking.
- Too much solder: A giant ball that obscures inspection and risks bridging. Use solder wick to remove excess.
FPV-Specific Soldering Tips
- Motor wires: Tin the pads first, then press the motor wire flat against the pad and reflow. The joint should be strong enough to survive a moderate tug without breaking.
- Battery leads (XT60/XT90): These are the highest-current connections on the quad. Use a large chisel tip, 400°C, and plenty of solder. The connection must handle 80-120A bursts without heating up. Pre-tin both the connector cup and the wire heavily, then join them with the iron at max temperature. Slide heat shrink over the connection before soldering.
- Receiver wires: These are tiny and fragile. Use the smallest tip you have, keep temperature moderate (320-340°C), and work quickly. It’s very easy to lift a receiver pad with too much heat.
- Ground pad challenges: Large ground planes on ESCs and FCs sink heat away from your iron. You may need to increase temperature by 20-30°C for ground pads. Apply flux first, be patient, and let the pad fully heat before adding solder.
Field Repairs
The Pinecil or TS100 running off a 4S/6S LiPo is the ultimate field repair tool. Keep a small kit in your bag: soldering iron, a few inches of solder, flux pen, solder wick, and heat shrink. A motor wire that breaks at the field doesn’t have to end your day if you can solder it back in 5 minutes.
Conclusion
Soldering is a skill that improves dramatically with practice. Buy a practice board (or a cheap PCB kit) and solder/desolder 50 times before working on your expensive flight controller. Focus on technique over speed — a clean joint takes 3 seconds, while fixing a bad joint takes 10 minutes and risks damaging pads. With the right tools, good solder, and proper technique, you’ll build quads that fly reliably for hundreds of packs.