
Why PID Tuning Matters for Cinematic FPV
Cinematic FPV flying demands smooth, predictable quadcopter behavior. Unlike aggressive freestyle or racing where sharp stick inputs are the norm, cinematic flying requires buttery-smooth throttle transitions and minimal oscillations. Betaflight 4.6 introduces powerful new tuning tools that make achieving cinematic-quality flight easier than ever before.
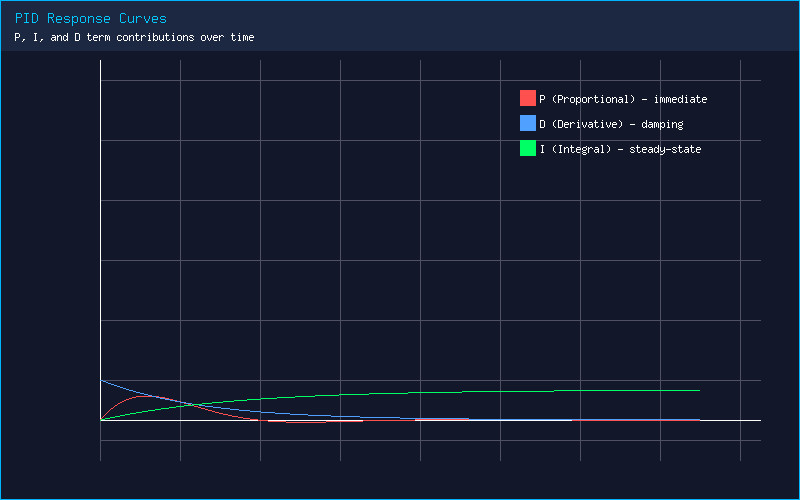
The PID controller in Betaflight governs how your flight controller responds to errors between desired and actual attitude. The Proportional (P) term provides immediate correction, the Integral (I) term eliminates steady-state error over time, and the Derivative (D) term dampens oscillations by anticipating future error. For cinematic flying, you generally want slightly lower P gains, moderate D gains for damping, and sufficient I to maintain attitude during slow, sweeping maneuvers.
Understanding Betaflight 4.6 Slider Tuning
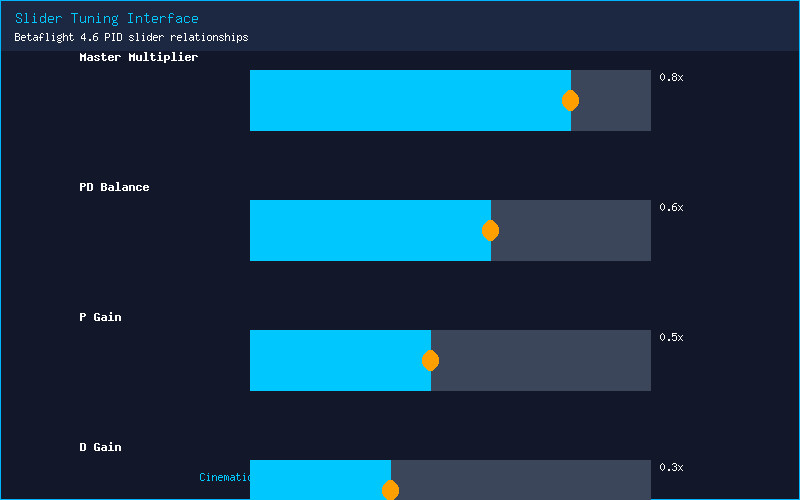
Betaflight 4.6 introduces the Slider Tuning interface, which replaces the intimidating PID number grid with an intuitive set of sliders. The Master Multiplier slider adjusts overall PID strength from 0.5x to 2.0x. For cinematic builds, starting at 0.8x to 0.9x provides a softer feel. The PD Balance slider shifts emphasis between P (left) and D (right) — moving it slightly right (60/40 split) increases damping for smoother footage. The Stick Response and Damping sliders offer fine-grained control over how aggressively the quad reacts to inputs and recovers from disturbances.
RPM Filtering for Jello-Free Footage
Jello in FPV footage is almost always caused by mechanical vibrations reaching the camera sensor. Betaflight 4.6’s improved RPM filtering can eliminate jello without sacrificing responsiveness. Enable Bidirectional DShot on the Configuration tab, then navigate to the Filters tab. Set the RPM Filter harmonics to 3 and the minimum frequency to 100 Hz. The key setting for cinematic builds is the Dynamic Notch Filter — set the range to 90-600 Hz with a Q factor of 200-300. This chases and suppresses motor noise peaks as they shift with throttle, keeping your GoPro or O4 footage crystal clear.
Feed Forward and I-Term Relax
Two advanced features in Betaflight 4.6 dramatically improve cinematic flight. Feed Forward adds stick overlay directly to motor output, bypassing the PID loop for sharper response. For cinematic flying, set Feed Forward Transition to 0.35 — this provides smooth stick feel without the robotic abruptness of higher values. I-Term Relax reduces I-term windup during aggressive maneuvers. Set I-Term Relax to 15-20 for cinematic builds; this prevents bounce-back after long sweeping turns and yaw spins.
Practical Tuning Workflow
Start with Betaflight 4.6 defaults for your frame size. Fly a test pack and record DVR. Look for three signs: propwash oscillations during descents (increase D slightly), slow wobble during hovering (increase P on roll/pitch by 2-3 points), and bounce-back after sharp stops (increase D or add I-Term Relax). Use the new in-flight adjustments feature — assign PID Profile selection to a three-position switch and tune backup profiles while keeping a safe default to fall back on.
For the final polish, enable Gyro Scaled filtering in the CLI with set gyro_scaled_filter = ON. This uses the gyro’s full dynamic range for cleaner data. Combined with RPM filtering, the result is footage that rivals dedicated cinema rigs at a fraction of the cost. Take your time, make small adjustments between test flights, and you will be rewarded with zero-jello, perfectly smooth cinematic FPV footage.
What PID settings are you running for cinematic FPV? Share your tune in the comments below!