
Introduction
A well-designed GoPro mount is the difference between buttery-smooth cinematic footage and unwatchable jello-filled video. While commercial mounts exist, 3D printing your own gives you complete control over camera angle, vibration isolation, weight, and crash survivability. This guide walks through the complete process of designing, printing, and testing a custom GoPro mount for your FPV drone.
Why Print Your Own GoPro Mount
Off-the-shelf GoPro mounts have three fundamental problems. First, they are designed for generic frame geometries and rarely fit perfectly on your specific quad. Second, they are almost always injection-molded from rigid plastics that transmit every frame vibration directly to the camera sensor. Third, they cost $15-25 for a single piece of plastic — a custom printed mount costs about $0.30 in TPU filament and you can print ten spares while you sleep.
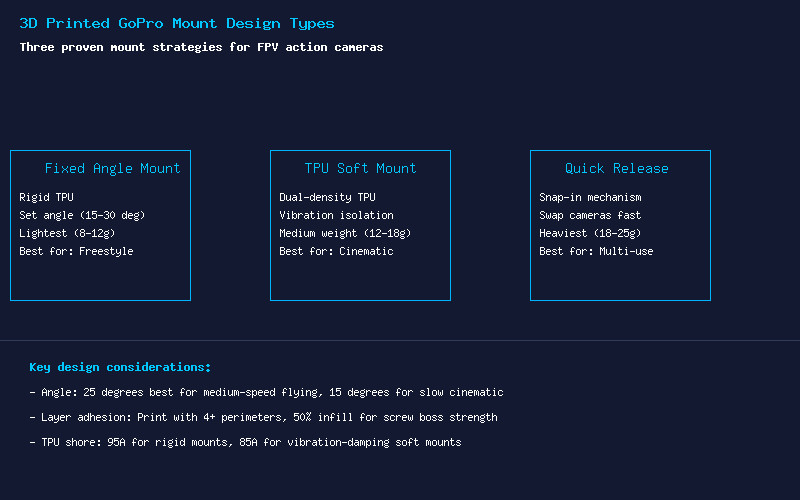
A custom mount lets you dial in your exact camera angle (25 degrees for medium-speed freestyle, 15 degrees for slow cinematic cruising, 35+ degrees for racing), integrate soft-mounting grommets directly into the design, and build in sacrificial failure points that protect your $300+ GoPro in a crash.
Three Mount Design Strategies
1. Fixed Angle Mount — The Lightest Option
The fixed angle mount is a single-piece TPU print with integrated screw bosses and a camera cage at your chosen angle. At 8-12 grams, this is the lightest option and ideal for freestyle pilots who always fly at the same camera angle. The simplicity means fewer parts to fail. Design the camera cage with 0.5mm of interference fit for a snug grip on the GoPro body, and include small TPU tabs that hook over the top of the camera for ejection prevention.
Print recommendations: 4 perimeters, 50% gyroid infill, TPU 95A. Orient the mount so the camera cage prints flat on the bed for maximum layer adhesion on the load-bearing surfaces. Expect 90-120 minutes of print time on a standard 0.4mm nozzle.
2. TPU Soft Mount — For Cinematic Footage
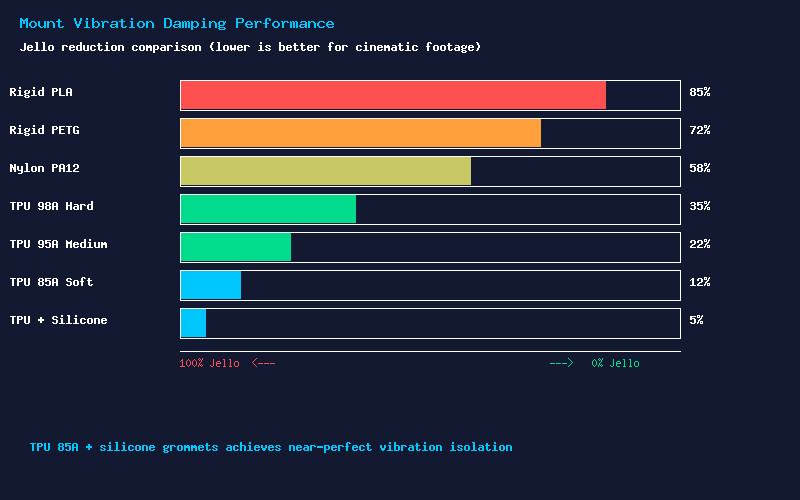
The soft mount separates the camera holding structure from the frame attachment point using TPU vibration-damping elements. This can be implemented as thin TPU arms (2-3mm cross section) that flex to absorb high-frequency vibrations, or as separate TPU grommets that compress between the mount base and frame. The dual-density approach — a rigid 98A TPU camera cage connected to a flexible 85A TPU base — achieves the best vibration isolation while maintaining camera position stability.
The soft mount typically weighs 12-18 grams. The trade-off is slightly more movement in hard crashes (the camera may shift angle), but for cinematic pilots, the vibration reduction is worth it. Combined with a ND filter on your GoPro for motion blur, this setup produces footage that rivals much more expensive vibration-isolated cinema rigs.
3. Quick Release Mount — Multi-Quad Flexibility
If you fly multiple quads with one GoPro, a quick-release system saves enormous time. The design uses a dovetail or T-slot rail printed into the frame-mounted base, with a matching slide on the camera cage. A spring-loaded TPU latch (or simple friction fit) locks the camera in place. Quick-release mounts weigh 18-25 grams due to the additional mechanism, but the convenience of swapping a GoPro between quads in under 5 seconds is transformative for pilots with multiple builds.
Vibration Isolation: The Science of Jello-Free Footage
Jello in FPV footage comes from the rolling shutter effect interacting with high-frequency vibrations. Your motors spin at 20,000-40,000 RPM, creating vibrations at 333-667Hz. If these vibrations reach the GoPro sensor, each row of pixels captures a slightly different position, creating the wobbly “jello” effect.
The solution is mechanical isolation with a natural frequency well below your motor RPM. A TPU soft mount with a natural frequency of 30-50Hz will attenuate motor vibrations by 20-30dB. To calculate the required stiffness: the natural frequency of a mass-spring system is f = (1/2pi) * sqrt(k/m), where k is the mount stiffness and m is the camera mass. For a 150g GoPro, you want k around 5-15 N/mm to achieve 30-50Hz natural frequency.
In practice, this means designing flexure arms that deflect 2-3mm under the weight of the GoPro. Too stiff and you pass vibrations; too soft and the camera wobbles during aggressive maneuvers.
Practical Design Tips
- ND filters are essential: Even with perfect vibration isolation, fast shutter speeds create stuttery footage. Use an ND8 or ND16 filter to force 1/60-1/120 shutter speeds for natural motion blur.
- Protect the lens: Extend the TPU cage 3-4mm past the front of the GoPro lens. In a head-on crash, the TPU absorbs the impact rather than the glass. Replace a $0.30 print instead of a $100 lens replacement.
- TPU shore hardness guide: 85A for maximum vibration damping (soft mounts), 95A for general purpose mounts, 98A for rigid fixed-angle racing mounts.
- Reinforce screw bosses: The screw holes securing your mount to the frame are the highest-stress points. Design bosses with 5mm minimum diameter and 3mm wall thickness. Use heat-set threaded inserts (M3) for repeated assembly without stripping.
- Test before trusting: Always test a new mount design over soft grass. A mount failure at 100 meters over concrete costs you a GoPro.
Conclusion
A custom 3D printed GoPro mount is one of the highest-value mods you can make to your FPV quad. Twenty minutes in CAD, two hours on the printer, and thirty cents of TPU filament produces a mount that outperforms $25 commercial alternatives. Design for your exact frame, tune the vibration isolation to your motor setup, and print spares — your footage (and your wallet) will thank you.