
Introduction
The sub-250 gram FPV drone category has exploded in popularity, and for good reason. In many countries, drones under 250g face significantly fewer regulations — no registration required, no Remote ID mandate, and fewer flight restrictions. But building a capable sub-250g quad that still delivers thrilling performance requires careful component selection and smart design. This guide covers everything from frame design to electronics selection, with a special focus on 3D printed frame options.
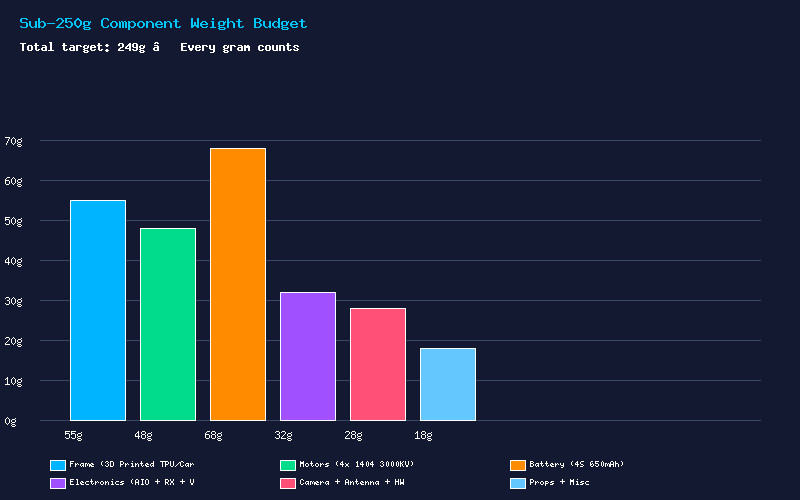
Why Sub-250g Matters in 2026
Regulatory frameworks worldwide are tightening. The FAA’s Remote ID requirements in the United States, EASA’s C-class labeling in Europe, and similar frameworks in Canada, Australia, and Japan all draw a hard line at 250 grams. Below 250g, most recreational FPV flying falls into a minimally regulated category. Above 250g, you enter a world of registration numbers, remote identification modules, and airspace authorization requirements.
Beyond regulations, sub-250g quads are simply more fun in many scenarios. They produce less kinetic energy in a crash (meaning less damage to property, people, and the drone itself), they are quieter, and they can fly in tighter spaces. A well-tuned 3-inch sub-250g build can easily hit 100km/h and pull 6G turns.
Frame Options: Carbon vs 3D Printed
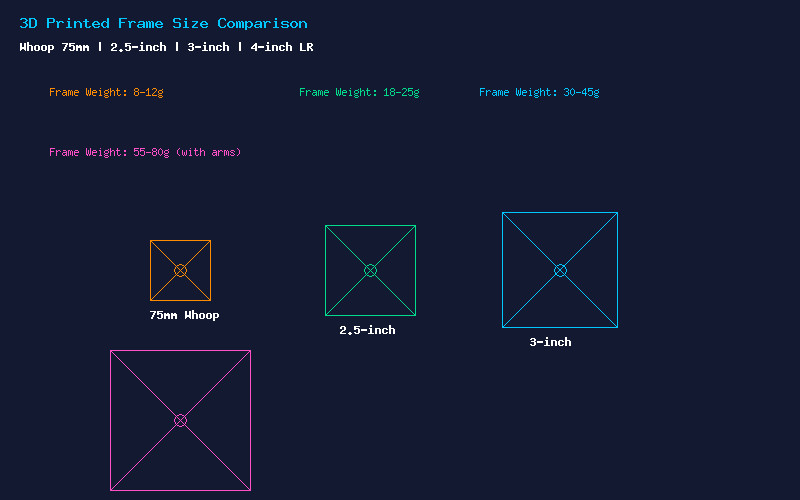
The frame is your largest opportunity for weight savings. Traditional carbon fiber frames for 3-inch builds weigh 30-45g. With careful 3D printing, you can achieve 18-30g frames that are strong enough for freestyle flying.
Carbon fiber frames remain the gold standard for ultimate durability. A high-quality 3mm carbon frame with proper weave orientation will survive crashes that would shatter a printed frame. Brands like AOS, BetaFPV, and Flywoo offer excellent sub-250g frames in the $25-40 range. The downside is limited customization — you are locked into the manufacturer’s geometry and mounting patterns.
3D printed frames offer unlimited customization. Using TPU 95A filament, you can create a frame that doubles as a vibration damper, with integrated camera mounts, antenna holders, and even conformal coating. The key to successful 3D printed frames is design: avoid sharp internal corners (stress risers), use generous fillets, and orient layer lines parallel to expected impact forces.
Electronics Selection for Ultralight Builds
All-in-One (AIO) flight controllers are essential for sub-250g builds. A modern AIO board combines the flight controller, 4-in-1 ESC, and often the VTX and ELRS receiver on a single PCB. The Happymodel X12, BetaFPV F4 2-4S AIO, and JHEMCU GHF405AIO all weigh under 8g while providing 12-15A ESCs and full Betaflight compatibility.
Motors: 1404 motors in 3000-3800KV range are the sweet spot for 3-inch builds on 4S. At approximately 8-9g each, four motors contribute about 35g to your build. For ultralight 2.5-inch builds, 1204 or 1303 motors around 4500-5000KV work well on 3S-4S, weighing just 5-7g each.
Batteries: A 4S 650mAh LiPo weighs roughly 68g and provides 3-5 minutes of aggressive flying. For cruising, a 4S 850mAh at 85g can extend flight times to 6-8 minutes while keeping you under 250g if your build is otherwise light.
Camera and VTX: The Caddx Ant Lite (2.0g) or RunCam Nano 3 (3.5g) paired with an AIO-mounted 25-400mW VTX keeps the video system under 6g total. For digital, the Walksnail Avatar HD Mini 1S Lite kit at 9.5g including camera and VTX brings HD video to sub-250g builds.
3D Printing Your Own Frame: Step by Step
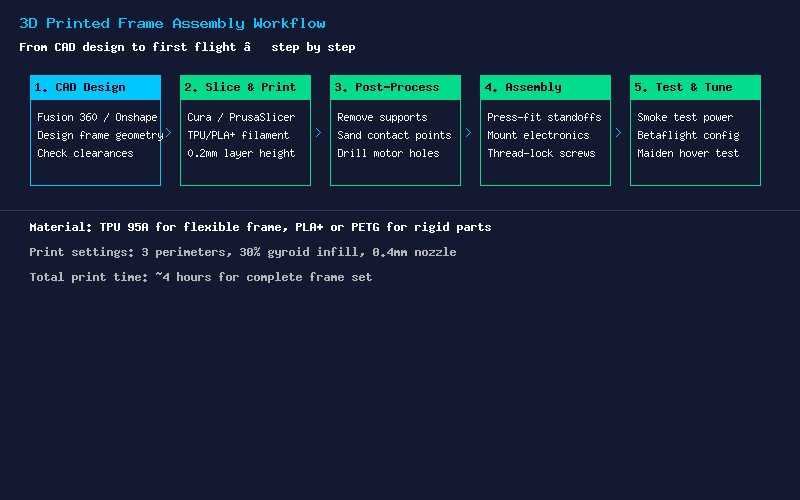
Step 1 — Design: Use Fusion 360 (free for hobbyists) or Onshape (browser-based) to model your frame. Start with the motor-to-motor diagonal you want (75mm for 1.6-inch, 100mm for 2.5-inch, 135mm for 3-inch). Design in proper standoff mounting points (M2 holes at 20×20 or 25.5×25.5mm patterns for whoop-style AIOs, or 30.5×30.5mm for mini stacks).
Step 2 — Slice settings: Use 3 perimeters (walls) for strength, 30% gyroid infill for multi-directional impact resistance, and 0.2mm layer height as a balance of strength and print speed. TPU prints best at 220-240C nozzle, 50-60C bed, and 20-30mm/s print speed.
Step 3 — Post-processing: Remove any support material carefully. Lightly sand motor mounting surfaces to ensure flatness. Run a 2mm drill bit through all holes to clean them. Test-fit all screws before assembly.
Step 4 — Assembly: Use thread-locking compound (Loctite 242 blue) on all metal-to-metal fasteners. TPU frames benefit from slightly oversized press-fit standoffs that compress for vibration damping. Route motor wires cleanly and secure them with small zip ties or TPU clips.
Real-World Build Example: 3-inch Ultralight
Here is a complete sub-250g build that achieves 245g all-up weight with a 4S 650mAh battery:
- Frame: Custom 3D printed TPU frame — 28g
- Flight Controller: Happymodel X12 AIO (FC + ESC + ELRS + VTX) — 7.8g
- Motors: RCinpower 1404 3000KV x4 — 34g
- Camera: Caddx Ant Lite — 2.0g
- Props: Gemfan 3016 tri-blade x4 — 6.4g
- Battery: GNB 4S 650mAh — 68g
- Hardware: Screws, standoffs, zip ties, antenna — 8g
- GPS: HGLRC M10 Nano — 3.5g
Total: 157.7g dry / 225.7g with battery. Add a GoPro Bones or Insta360 GO 3S mount for an additional 5-10g and you are still safely under 250g with a removable action camera setup.
Tuning a Sub-250g Build
Ultralight builds require different PID tuning than heavier quads. The lower inertia means the quad reacts faster to PID changes, but it also means it is more susceptible to prop wash and wind gusts. Start with Betaflight 4.6 default PIDs for 3-inch, then reduce D gains by 15-20% and I gains by 10%. Enable RPM filtering with Bluejay 48kHz ESC firmware for the cleanest possible gyro signal. Set your dynamic notch filter width to medium and Q to 400 for a starting point.
For 3D printed frames specifically, enable the gyro lowpass 2 filter at 250Hz and D-term lowpass 2 at 200Hz to compensate for the additional resonance that TPU frames can introduce. Check your motor temperatures after the first flight — warm is fine, hot to the touch means you need to lower your filters further.
Conclusion
Building a sub-250g FPV drone that performs like a larger quad is absolutely achievable in 2026. The combination of modern ultralight electronics and custom 3D printed frames opens up possibilities that simply did not exist a few years ago. Start with a quality AIO board, choose motors appropriate for your frame size, and iterate on your 3D printed frame design. The satisfaction of flying a drone you designed and printed yourself — while staying fully regulation-friendly — is hard to beat.